nginx配置用户和密码 Ubuntu 20.04
Step 1 — Creating the Password File
To start out, you need to create a file that will hold your username and password combinations. You can do this by using the OpenSSL utilities that may already be available on your server. Alternatively, you can use the purpose-made htpasswd utility included in the apache2-utils package (Nginx password files use the same format as Apache). Choose the method below that you like best.
Option 1 — Creating the Password File Using the OpenSSL Utilities
If you have OpenSSL installed on your server, you can create a password file with no additional packages. You will create a hidden file called .htpasswd in the /etc/nginx configuration directory to store your username and password combinations.
You can add a username to the file using this command. sammy is used here as the username, but you can use whatever name you’d like:
sudo sh -c "echo -n 'sammy:' >> /etc/nginx/.htpasswd"
Next, add an encrypted password entry for the username by typing:
sudo sh -c "openssl passwd -apr1 >> /etc/nginx/.htpasswd"
You can repeat this process for additional usernames. You can see how the usernames and encrypted passwords are stored within the file by typing:
cat /etc/nginx/.htpasswd
sammy:$apr1$wI1/T0nB$jEKuTJHkTOOWkopnXqC1d1
Option 2 — Creating the Password File Using Apache Utilities
While OpenSSL can encrypt passwords for Nginx authentication, many users find it easier to use a purpose-built utility. The htpasswd utility, found in the apache2-utils package, serves this function well.
Install the apache2-utils package on your server by typing:
sudo apt update
sudo apt install apache2-utils
Now, you have access to the htpasswd command. You can use this to create a password file that Nginx can use to authenticate users. Create a hidden file for this purpose called .htpasswd within your /etc/nginx configuration directory.
The first time you use this utility, you need to add the -c option to create the specified file. Specify a username (sammy in this example) at the end of the command to create a new entry within the file:
sudo htpasswd -c /etc/nginx/.htpasswd sammy
You will be asked to supply and confirm a password for the user.
Leave out the -c argument for any additional users you wish to add:
sudo htpasswd /etc/nginx/.htpasswd another_user
If you view the contents of the file, you can see the username and the encrypted password for each record:
cat /etc/nginx/.htpasswd
sammy:$apr1$lzxsIfXG$tmCvCfb49vpPFwKGVsuYz.
another_user:$apr1$p1E9MeAf$kiAhneUwr.MhAE2kKGYHK.
Step 2 — Configuring Nginx Password Authentication
Now that you have a file with your users and passwords in a format that Nginx can read, you need to configure Nginx to check this file before serving your protected content.
Begin by opening up the server block configuration file that you wish to add a restriction to. For your example, you’ll be using the default server block file installed through Ubuntu’s Nginx package:
sudo nano /etc/nginx/sites-enabled/default
To set up authentication, you need to decide on the context to restrict. Among other choices, Nginx allows you to set restrictions on the server level or inside a specific location.
This example will be for a server level restriction. The auth_basic directive turns on authentication and a realm name to be displayed to the user when prompting for credentials. You will use the auth_basic_user_file directive to point Nginx to the password file you created:
/etc/nginx/sites-enabled/default
server {
    listen 80 default_server;

     . . .

    auth_basic "Restricted Content";
    auth_basic_user_file /etc/nginx/.htpasswd;
}
Note: Depending on which block you place the restrictions, you can control the granularity of which parts of your site require a password. This alternative example restricts only the document root with a location block, and you can even modify this listing to only target a specific directory within the web space:
/etc/nginx/sites-enabled/default
server {
    listen 80 default_server;

     . . .

    location / {
    try_files $uri $uri/ =404;
    auth_basic "Restricted Content";
    auth_basic_user_file /etc/nginx/.htpasswd;
    }
}
Save and close the file when you are finished. Restart Nginx to implement your password policy:
sudo systemctl restart nginx
The directory you specified should now be password protected.
Step 3 — Confirming the Password Authentication
To confirm that your content is protected, try to access your restricted content in a web browser:
http://server_domain_or_IP
You should be presented with a username and password prompt:
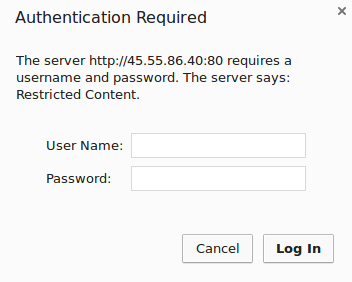
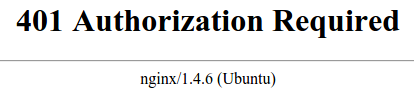
If you enter the correct credentials, you will be allowed to access the content. If you enter the wrong credentials or hit “Cancel”, you will see the “Authorization Required” error page:
You should now have everything you need to set up basic authentication for your site. Keep in mind that password protection should be combined with TLS encryption so that your credentials are not sent to the server in plain text.
阅读量: 2367
发布于:
修改于:
发布于:
修改于: