从零开始实现Ruby on Rails GraphQL API
This week, I've been working on a takehome technical challenge asking me to deep-dive into GraphQL and create a simple API. I've never worked with GraphQL before, so I opted to stick with Ruby on Rails for learning it.
This tutorial is designed to walk through the steps to create a GraphQL API with Ruby on Rails and the Ruby gem 'graphql'.
- I will use the Insomnia REST client for API calls instead of the 'graphiql' IDE -- if you don't already have it installed, go ahead and do that now!
- I will start with simple Order and Payment models, but eventually (in a future article) branch into more complicated relationships (and implementing features like filtering objects with custom methods directly on the model and has_many declaration)
- I will explore "idempotency" in GraphQL as part of Mutations (in a future article), using strategies covered in this EXCELLENT article by Todd Jefferson
Overview
In this first article, we'll go through the steps to:
- create a Rails API
- add some models
- add GraphQL
- write and execute our first GraphQL Query
GraphQL has two ways of interacting with databases
- Query -- this allows us to get data ("Read" in CRUD)
- Mutation -- this allows us to change information, including adding, updating, or removing data ("Create", "Update", "Destroy" in CRUD)
We'll keep our focus on getting the API running, and understanding our first simple Query.
Let's dive in!
What is GraphQL?
GraphQL is a query language we can use to get and mutate data in a database. It gives users a lot of control over what data you want to get back by targeting specific models and fields to return. It is also strongly typed, so you know exactly what kind of data you're receiving!
GraphQL is language-independent, so the Ruby implementation we will be using is the Ruby gem 'graphql'. This gives us a specific file structure and some command-line tools to easily add GraphQL functionality to our Rails API.
Creating the Rails app
'rails new'
Run the following command in your terminal to create a new Rails project called devto-graphql-ruby-api. Feel free to leave out any of these --skip flags, but none of them will be used:
$ rails new devto-graphql-ruby-api --skip-yarn --skip-action-mailer --skip-action-cable --skip-sprockets --skip-coffee --skip-javascript --skip-turbolinks --api
Generating models
Inside the directory, let's create our Order and Payment models:
$ rails g model Order description:string total:float
$ rails g model Payment order_id:integer amount:float
I prefer to set up my has_many-belongs_to relationships by hand, so let's make Payments belong to an Order:
# app/models/order.rb
class Order < ApplicationRecord
    has_many :payments
end

# app/models/payment.rb
class Payment < ApplicationRecord
    belongs_to :order
end
Create database
Run $ rails db:create to create the (default) SQLite3 development database.
Run migrations
Run $ rails db:migrate to add our models to the database.
Add seed data
Add a few example objects to seed our database:
# db/seeds.rb
order1 = Order.create(description: "King of the Hill DVD", total: 100.00)
order2 = Order.create(description: "Mega Man 3 OST", total: 29.99)
order3 = Order.create(description: "Punch Out!! NES", total: 0.75)

payment1 = Payment.create(order_id: order1.id, amount: 20.00)
payment2 = Payment.create(order_id: order2.id, amount: 1.00)
payment3 = Payment.create(order_id: order3.id, amount: 0.25)
Then run $ rails db:seed to add the data to the database.
Now we're ready to start adding in GraphQL on top of our models!
Adding GraphQL
Add 'graphql' gem to Gemfile
# Gemfile
gem 'graphql'
Then run $ bundle install to install the gem in the app.
Install GraphQL with 'rails generate'
Run $ rails generate graphql:install. This will add the /graphql/directory to the app's main directory, as well as a GraphQL-specific controller at /controllers/graphql_controller.rb.
Add GraphQL objects for models
We now need to create GraphQL objects to match our models:
$ rails generate graphql:object order
$ rails generate graphql:object payment
$ rails generate graphql:object payment
Filling out the new GraphQL files
Okay, we now have all the files and directories needed to build our first Query! But, some of those files still need some more code.
Define the GraphQL Types and their fields
GraphQL Types are defined with fields that tell us what data we can get from them:
# app/graphql/types/payment_type.rb
module Types
    class PaymentType < Types::BaseObject
        field :id, ID, null: false
        field :amount, Float, null: false
    end
end
This allows us to retrieve PaymentType objects that contain an id field (with a special ID primary key), and an amount field that will be a Float. Because both are set to null: false, receiving a Query response with nil in either field will throw an error.
Our GraphQL objects inherit from Types::BaseObject. Thus, when we define our class PaymentType < Types::BaseObject, we now have a Types::PaymentType available. We can use these custom Types to define what we get back from each field.
Let's take a look at how we can use Types::PaymentType in OrderType:
# app/graphql/types/order_type.rb
module Types
    class OrderType < Types::BaseObject
        field :id, ID, null: false
        field :description, String, null: false
        field :total, Float, null: false
        field :payments, [Types::PaymentType], null: false
        field :payments_count, Integer, null: false

        def payments_count
            object.payments.size
        end
    end
end
Several things to note here:
- Because the Order model has columns for id, description, and total, we can simply create a field for them and retrieve their data.
- Because of our has_many-belongs_to relationship, we can also make a payments field to return all Types::PaymentType objects belonging to each Order.
- However, Order does NOT have a payments_count column--so we define a payments_count() method to return an integer with the length of the payments array.
- NOTE: inside these custom field methods, we need to access the Order's payments through object.payments--don't forget that critical object!
Define fields on QueryType
We're almost ready to write that first Query, but first, we need to tell the main QueryType to expect it. When GraphQL receives a Query request (as opposed to a Mutation request), it will be routed to the QueryType class. Like with the Types above, we will define possible Query methods through fields.
Our first Query will simply be to retrieve all Orders in the database. Inside the class QueryType declaration, we'll add a field that returns an array of Types::OrderType:
# app/graphql/types/query_type.rb
module Types
    class QueryType < Types::BaseObject
        field :all_orders, [Types::OrderType], null: false

        def all_orders
            Order.all
        end
    end
end
As above, we define our all_orders() method underneath the field with the same name, and tell it to implicity return all Orders.
Everything's now set! We can open up Insomnia and write our first Query to get all Orders back from the database.
Writing our first Query
GraphQL Query format
Here's what our first Query will look like:
query {
    allOrders {
        id
        description
        total
        payments {
            id
            amount
        }
        paymentsCount
    }
}
At the top, we define the request as a query {}.
Inside the query, we call the QueryType's all_orders via allOrders {}. Yep, don't forget to switch from snake-case to camel-case!
Inside allOrders {}, we select the fields from the Order model we want returned. These are the same fields we defined in app/graphql/types/order_type.rb. You can pick and choose which ones you want to receive!
Note that, with our payments {} field, we also have to define the fields from Types::PaymentType that we want to receive. The fields available are the ones we defined in app/graphql/types/payment_type.rb.
The paymentsCount field will run the payments_count method on Types::OrderType, and return the appropriate value.
Let's get this Query into Insomnia and test our API!
Execute Query in Insomnia
Open Insomnia, and create a new POST request. In the top-left corner of the request text editor, make sure the the POST request's format is set to "GraphQL Query".
Go ahead and add the code from the query above. Then send it off, and see what it returns:

Woo! Our data's all nice and organized--and it's exactly and ONLY what we requested!
Let's run a similar query, but with a fewer fields:
query {
    allOrders {
        description
        total
        payments {
            amount
        }
    }
}
Result:

Perfect! If we don't need the ids or the paymentsCount, no need to include them in the Query at all!
Conclusion
We now have a very simple API to Query data from a database using GraphQL! However, since GraphQL Queries can only retrieve data, we can't use our current code to make any changes to the database.
That's where Mutations come in! We'll cover that in the next installment. ;)
And once again -- thank you to Matt Boldt and his AWESOME Rails GraphQL tutorial for helping me get this far! <3
Any tips or advice for using GraphQL in Rails, or GraphQL in general? Feel free to contribute below!
Continuing from the last installment, we're going to introduce the other type of request in GraphQL: Mutations.
Continuing from the last installment, we're going to introduce the other type of request in GraphQL: Mutations.
Mutations allow us to create, update, or destroy data in our database. Paired with the Query's ability to read data, we now have a full set of CRUD actions!
In this tutorial, we will focus on building a simple mutation to create a new Order record in our database.
Once again, this tutorial is largely adapted from this AMAZING tutorial by Matt Boldt. Thanks again, Matt!!
Overview
In this second article, we'll go through the steps to:
- create the needed Mutation files
- create our first mutation (add a new Order to the database)
- add routing to /app/graphql/types/mutation_type.rb
- write and execute our first GraphQL Mutation in Insomnia
Let's dive in!
What is a GraphQL Mutation?
Most discussions of GraphQL focus on data fetching, but any complete data platform needs a way to modify server-side data as well.
(Emphasis mine)
Mutations are exactly that--a request that modifies (creates, updates, destroys) data in the database.
GraphQL mutation format
Similar to Queries, this is what our first GraphQL mutation will look like:
mutation {
  createOrder(input: {
    description: "Octo Octa - Resonant Body (vinyl)",
    total: 21.82
  }) {
    order {
      id
      description
      total
      payments {
        id
        amount
      }
      paymentsCount
    }
    errors
  }
}
Several things to notice:
- At the very top, we define our request as a mutation instead of query--this is necessary for routing the request correctly, which we'll cover below
- createOrder is the name we will give to our mutation, and we call it like a function with the arguments inside parentheses: createOrder( input: {} )
- the mutation accepts input, structured as a hash, where we pass a string for description and a float for amount (we can set these inputs to optional, or make them required)
- following the closing parentheses from createOrder(), we add another hash to outline the data we want to return from the mutation
- notice that it looks essentially the same as our first query, except that we also return errors along with the new order we created
- this return is optional, but it is a good idea--you can both mutate the database AND query the data in one atomic operation, which is very efficient!
Okay, now that we know what our mutation request is going to look like, let's actually build out the code!
Adding mutations to our /app/
Navigate to the /app/graphql/mutations directory, and you'll notice it's empty (except for that empty .keep file). Right now, our app does not have any mutations. To add them in, we'll need to do a few things:
- Create a BaseMutation class for our mutations to inherit from
- Create a specific mutation (createOrder) which inherits from BaseMutation
- Add routing to /app/graphql/types/mutation_type.rb (much like we did with /app/graphql/types/query_type.rb in the previous article)
After that, we can repeat steps 2 and 3 for each new mutation we want to add!
Creating a mutation
Create new file /app/graphql/mutations/base_mutation.rb
Let's create a base type for our other mutations to inherit from. Create a new base_mutation.rb file in the (mostly) empty /app/graphql/mutations directory, and add this code:
# /app/graphql/mutations/base_mutation
class Mutations::BaseMutation < GraphQL::Schema::RelayClassicMutation
end
That's it!
Note that the module we're inheriting from is RelayClassicMutation--the GraphQL Ruby gem actually has another GraphQL::Schema::Mutationmodule, but RelayClassicMutation gives us some nice functionality, especially around simplifying input: to accept a single hash.
Create new file for our specific mutation
In the same /app/graphql/mutations directory, add another file. This will be the same name as the mutation, but in snake-case: for the createOrder mutation, name the file /app/graphql/mutations/create_order.rb.
Here's what we'll add to the file to create the mutation:
# /app/graphql/mutations/create_order.rb
class Mutations::CreateOrder < Mutations::BaseMutation
    argument :description, String, required: true
    argument :total, Float, required: true

    field :order, Types::OrderType, null: false
    field :errors, [String], null: false

    def resolve(description:, total:)
        order = Order.new(description: description, total: total, reference_key: SecureRandom.uuid)
        if order.save
            {
                order: order,
                errors: []
            }
        else
            {
                order: nil,
                errors: order.errors.full_messages
            }
        end
    end
end
Let's step through what we're seeing after we declare the class:
arguments
# /app/graphql/mutations/create_order.rb
    argument :description, String, required: true
    argument :total, Float, required: true
Here, we specify the arguments that our mutation request can take. After argument, we supply three things:
- name of the argument (:description)--we will use this as the key in our key-value pairs for inputs
- data type (String)--the mutation request will throw errors if the correct data type is not provided
- required, as a boolean (required: true)--this allows us to specify if an argument must be present to succeed
- required: true will throw an error if not present
- required: false will make the argument optional
fields
# /app/graphql/mutations/create_order.rb
    field :order, Types::OrderType, null: false
    field :errors, [String], null: false
Here, we specify the fields that our mutation request returns. Our two fields, :order and :errors, will handle two cases:
- if the mutation is successful, an Order object will be returned (just like a Query)
- if the mutation fails, we will get back a set of errors
After field, we supply three things:
- name of the field (:order, :errors)--we will use this as the key in our key-value pairs for our return data
- data type (Types::OrderType, [String])--these tell us what type of data to expect in the return
- as with Queries, we can specify any data type, including our custom types created in the /app/graphql/types/ directory
- we can also return an array of another type, such as returning an array of errors as strings via [String]
- null, as a boolean (required: true)--this allows us to specify if we are allowed to receive nil fields in our return data
- null: false will throw an error a field is nil
- null: true will allow nil data to be returned without errors
resolve()
# /app/graphql/mutations/create_order.rb
    def resolve(description:, total:)
        order = Order.new(description: description, total: total)
        if order.save
            {
                order: order,
                errors: []
            }
        else
            {
                order: nil,
                errors: order.errors.full_messages
            }
        end
    end
This is where the magic happens! All mutations have a resolve() function, and that function returns (as a hash) what the mutation itself will return. Let's step through the code:
- resolve() takes the arguments we specified above
- we immediately use ActiveRecord to create a new Order, using the data from the arguments
- in a familiar Rails pattern, we test if the Order can be saved in the database
- if successful, we return a hash with the order key containing our newly-saved Order instance, and an empty array of errors
- if failed, we return a nil Order, and an array of errors
This is a very straightforward resolve() method, but it can easily be added to! You can make and call helper functions within the CreateOrder class, so long as the resolve() function ultimately returns a hash for the mutation's response.
We're almost read to try out our first mutation! But first, we have to make sure our app knows how to route the mutation request properly.
Add routing to /app/graphql/types/mutation_type.rb
By default, our /app/graphql/types/mutation_type.rb will be created with only a test-field that returns "Hello World", which we are directed to remove. Go ahead and delete that now, so that our class looks nice and empty:
# /app/graphql/types/mutation_type.rb
module Types
  class MutationType < Types::BaseObject
  end
end
Perfect, a blank slate!
Inside here, we now simply specify a field that looks for our mutation's name, and routes to the correct mutation class:
# /app/graphql/types/mutation_type.rb
module Types
  class MutationType < Types::BaseObject

    field :create_order, mutation: Mutations::CreateOrder

  end
end
Now, when we send a GraphQL mutation called createOrder, the arguments we provide will be sent to the Mutations::CreateOrder class we just created in /app/graphql/mutations/create_order.rb!
We're finally ready to test!!
Executing our first Mutation
Go ahead and run rails s in your terminal to start our Rails server on http://localhost:3000/graphql/.
Next, open up Insomnia and create a new POST request, and set it to a GraphQL structured query.
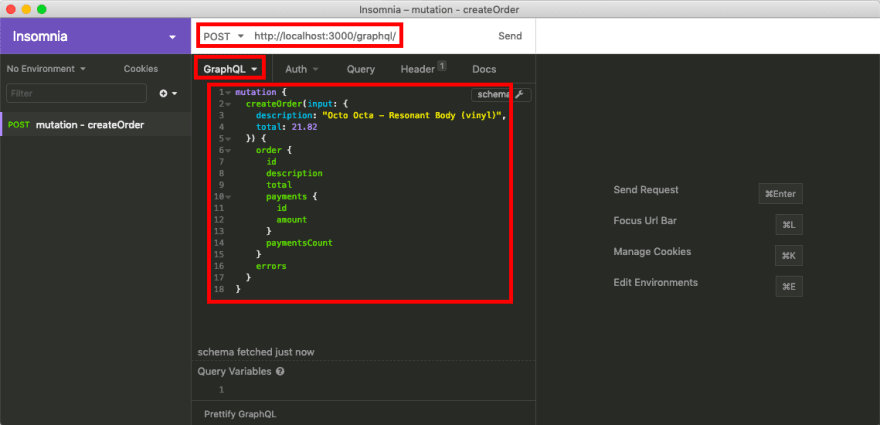
Then, add in our mutation code from above:
mutation {
  createOrder(input: {
    description: "Octo Octa - Resonant Body (vinyl)",
    total: 21.82
  }) {
    order {
      id
      description
      total
      payments {
        id
        amount
      }
      paymentsCount
    }
    errors
  }
}
Note that there are a couple differences from the Query we created last time:
- the top line says mutation {} instead of query {}--this is necessary for correct routing to /app/graphql/types/mutation_type.rb
- inside, we call createOrder() as a function, and supply input: as a hash containing our fields as keys
- immediately following the createOrder() call, we also provide a structure for the returned data, including an order and errors
Here's what we've got in Insomnia right now:
Go ahead and send the request, and you'll see it comes back successful. We can access our newly created (and saved!) Order via the order key. We can also see that our array of errors is empty:

Now, let's test a failed mutation. Remove the description: field of the input entirely:
mutation {
  createOrder(input: {
    total: 21.82
  }) {
    order {
      id
      description
      total
      payments {
        id
        amount
      }
      paymentsCount
    }
    errors
  }
}
And resend the request, and you'll see it comes back with an error describing a missing required input field named "description":

Great! The errors provided by the GraphQL Ruby gem are very explicit, so make sure to read them closely when debugging.
Conclusion
We've now implemented a GraphQL API with the ability to read Orders from our database, and now create new Orders too! From here, we can build new mutations to handle updating and deleting data as well.
And once again -- thank you to Matt Boldt and his AWESOME Rails GraphQL tutorial for helping me get this far! <3
Any tips or advice for using GraphQL in Rails, or GraphQL in general? Feel free to contribute below!
Building on our Rails GraphQL API from previous articles, we will now look at filtering data using two tools:
- Custom Fields in our GraphQL Queries
- Class Methods directly on our Rails Models (as inspired by this great StackOverflow response)
We will add a status column to our Payments table, and add a filter to only return "Successful" payments in our queries.
Once again, this tutorial is largely adapted from this AMAZING tutorial by Matt Boldt. Thanks again, Matt!!
Overview
In this third article, we'll go through the steps to:
- add a status column to our Payments table (and update our seed file)
- add a successful class method to our Order model to filter by "Successful" payments
- add a custom field to our GraphQL order_type to call the .successful class method
- write and execute a GraphQL query to demonstrate the filter in Insomnia
Let's dive in!
Use Case: Filtering by Status
Let's say we want our API to know the difference between "Successful" and "Failed" payments. This would allow us to use only "Successful" payments when doing things like calculating a total balance, generating receipts, or other situations where we don't want to expose every single payment.
Rails Migration: Add status to Payments
Run rails g migration AddColumnStatusToPayments. This will create a new database migration file. Open it up, and create a new column for status on the Payments table:
# /db/migrate/20190929153644_add_column_status_to_payments.rb

class AddColumnStatusToPayments < ActiveRecord::Migration[5.2]
  def change
    add_column :payments, :status, :string
  end
end
We'll also update our seed file to add some "Successful" payments to our database, along with one "Failed" payment on our first Order:
# /db/seeds.rb

Order.destroy_all
Payment.destroy_all

order1 = Order.create(description: "King of the Hill DVD", total: 100.00)
order2 = Order.create(description: "Mega Man 3 OST", total: 29.99)
order3 = Order.create(description: "Punch Out!! NES", total: 0.75)

payment1 = Payment.create(order_id: order1.id, amount: 20.00, status: "Successful")
payment2 = Payment.create(order_id: order2.id, amount: 1.00, status: "Successful")
payment3 = Payment.create(order_id: order3.id, amount: 0.25, status: "Successful")
payment4 = Payment.create(order_id: order1.id, amount: 5.00, status: "Failed")
Now, run rails db:migrate and rails db:seed to run the migration and re-seed the database.
Check out our database with rails c
Go ahead and run rails c to open up a Rails console in your terminal.
Remember that we created our Order model to have a has_many relationship with Payments:
# /app/models/order.rb

class Order < ApplicationRecord
    has_many :payments
end
In our Rails console, we can use Order.all[0] to check out the first Order in the database, and Order.all[0].payments to see its Payments:
[10:28:27] (master) devto-graphql-ruby-api
// ♥ rails c

Running via Spring preloader in process 6225
Loading development environment (Rails 5.2.3)

2.6.1 :001 > Order.all[0]
  Order Load (0.5ms)  SELECT "orders".* FROM "orders"
 => #<Order id: 16, description: "King of the Hill DVD", total: 100.0, created_at: "2019-09-29 17:20:34", updated_at: "2019-09-29 17:20:34">

2.6.1 :002 > Order.all[0].payments
  Order Load (0.2ms)  SELECT "orders".* FROM "orders"
  Payment Load (0.2ms)  SELECT  "payments".* FROM "payments" WHERE "payments"."order_id" = ? LIMIT ?  [["order_id", 16], ["LIMIT", 11]]
 => #<ActiveRecord::Associations::CollectionProxy [#<Payment id: 1, order_id: 16, amount: 20.0, created_at: "2019-09-29 17:20:34", updated_at: "2019-09-29 17:20:34", status: "Successful">, #<Payment id: 4, order_id: 16, amount: 5.0, created_at: "2019-09-29 17:20:34", updated_at: "2019-09-29 17:20:34", status: "Failed">]>
Cool! We can see that our first Order has both a "Successful" and a "Failed" payment in its associations.
Now, let's look at filtering our results to only return "Successful" payments with our GraphQL queries!
Class Methods on Rails Models
In my previous Rails projects, I didn't do much in my Models' files beyond setting up has_many / belongs_to relationships. However, a great StackOverflow discussion showed me we can expand a has_many declaration with additional functionality. The article itself demonstrates this with a has_many-through relationship, but the pattern works the same for simple has_many relationships too!
Open up our Order model, and build out the has_many declaration by adding a do...end block:
# /app/models/order.rb

class Order < ApplicationRecord
    has_many :payments do
        # we can add additional functionality here!
    end
end
This is the perfect place to filter our payments: any methods we define here can be chained directly onto order.payments!
Let's make a method to use SQL to filter payments to only "Successful" ones:
# /app/models/order.rb

class Order < ApplicationRecord
    has_many :payments do
        def successful
            where("status = ?", "Successful")
        end
    end
end
Now, if we run order.payments.successful, we will automatically invoke the ActiveRecord where method. This will only allow payments with the status equal to "Successful" to be returned!
Save the order.rb file, and open up a Rails console with rails c again. Now run Order.all[0].payments, then Order.all[0].payments.successful to see the filter in action:
[10:41:36] (master) devto-graphql-ruby-api
// ♥ rails c

Running via Spring preloader in process 6277
Loading development environment (Rails 5.2.3)

2.6.1 :001 > Order.all[0].payments
  Order Load (1.0ms)  SELECT "orders".* FROM "orders"
  Payment Load (0.2ms)  SELECT  "payments".* FROM "payments" WHERE "payments"."order_id" = ? LIMIT ?  [["order_id", 16], ["LIMIT", 11]]
 => #<ActiveRecord::Associations::CollectionProxy [#<Payment id: 1, order_id: 16, amount: 20.0, created_at: "2019-09-29 17:20:34", updated_at: "2019-09-29 17:20:34", status: "Successful">, #<Payment id: 4, order_id: 16, amount: 5.0, created_at: "2019-09-29 17:20:34", updated_at: "2019-09-29 17:20:34", status: "Failed">]>

2.6.1 :002 > Order.all[0].payments.successful
  Order Load (0.2ms)  SELECT "orders".* FROM "orders"
  Payment Load (0.4ms)  SELECT  "payments".* FROM "payments" WHERE "payments"."order_id" = ? AND (status = 'Successful') LIMIT ?  [["order_id", 16], ["LIMIT", 11]]
 => #<ActiveRecord::AssociationRelation [#<Payment id: 1, order_id: 16, amount: 20.0, created_at: "2019-09-29 17:20:34", updated_at: "2019-09-29 17:20:34", status: "Successful">]>
Great! Now we can chain order.payments.successful to use this filter. Now let's connect this functionality to our GraphQL query!
Add a Custom Field to a Query
Update PaymentType with the new :status field
Turning our attention back to our GraphQL Types, here's what our current PaymentType and its fields look like:
# /app/graphql/types/payment_type.rb

module Types
  class PaymentType < Types::BaseObject
    field :id, ID, null: false
    field :amount, Float, null: false
  end
end
Since we've added a status column to the Rails model, let's add a :status field to our GraphQL type:
# /app/graphql/types/payment_type.rb

module Types
  class PaymentType < Types::BaseObject
    field :id, ID, null: false
    field :amount, Float, null: false
    field :status, String, null: false
  end
end
We can now update our previous query for allOrders to include :status too:
query {
    allOrders {
        id
        description
        total
        payments {
            id
            amount
            status
        }
        paymentsCount
    }
}
Run rails s to start the Rails server, then send the query in Insomnia to http://localhost:3000/graphql/ :

Now let's get filterin'!
Update OrderType with a new :successful_payments custom field
Our OrderType currently looks like this:
# /app/graphql/types/order_type.rb

module Types
  class OrderType < Types::BaseObject
    field :id, ID, null: false
        field :description, String, null: false
        field :total, Float, null: false
        field :payments, [Types::PaymentType], null: false
        field :payments_count, Integer, null: false

        def payments_count
            object.payments.size
        end
  end
end
Our :payments field uses the has_many relationship to pull all the belonging PaymentType instances into the response.
We also have one custom field, :payments_count, where we can call class methods from the Order object. (Don't forget that quirk about using object to refer to the Order instance!)
Let's add a new custom field, :successful_payments, and define a method (with the same name) that will simply use our new order.payments.successful method chain:
# /app/graphql/types/order_type.rb

module Types
  class OrderType < Types::BaseObject
    field :id, ID, null: false
        field :description, String, null: false
        field :total, Float, null: false
        field :payments, [Types::PaymentType], null: false
        field :payments_count, Integer, null: false
        field :successful_payments, [Types::PaymentType], null: false

        def payments_count
            object.payments.size
        end

        def successful_payments
            object.payments.successful
        end
  end
end
Our new custom field :successful_payments returns an array of PaymentTypes via [Types::PaymentType] (just like the :payments field does). We also set null: false by default to catch errors with the data.
Let's update the allOrders query to include the new :successful_payments field. (I've also taken out the payments and paymentCount fields.)
Don't forget to change the snake_case to camelCase! (:successful_payments => successfulPayments)
query {
    allOrders {
        id
        description
        total
        successfulPayments {
            id
            amount
            status
        }
    }
}
Start the Rails server with rails s, and run the query in Insomnia:
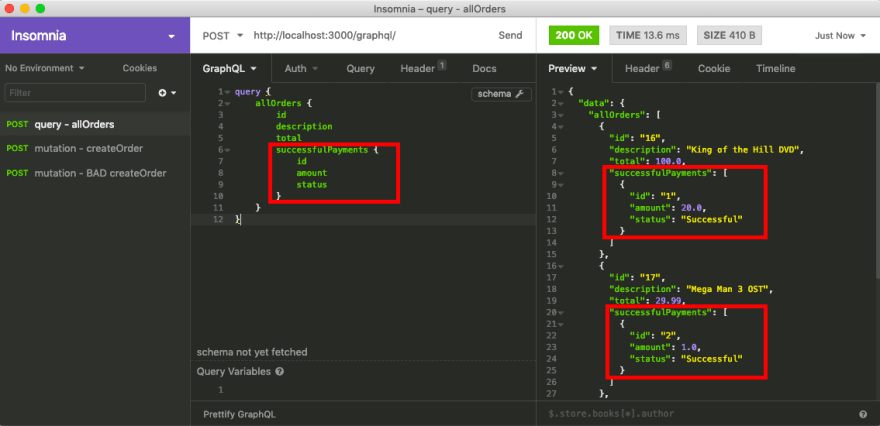
Awesome! Now, our Rails model Order is providing a simple, one-word .successful filter for its Payments. Using it in our GraphQL query is as simple as making a new field that calls that method!
Conclusion
We've now implemented a GraphQL API with the ability to filter the Payments belonging to an Order by their "Successful" status! From here, we can build additional functionality to use the successful payments` data--for instance, calculating a current balance based on the order's total.
Here's another shameless plug for that awesome StackOverflow reply demonstrating how you can build out functionality on a Rails model's has_many and has_many-through relationship: https://stackoverflow.com/a/9547179
And once again -- thank you to Matt Boldt and his AWESOME Rails GraphQL tutorial for helping me get this far! <3
Any tips or advice for using GraphQL in Rails, or GraphQL in general? Feel free to contribute below!
阅读量: 1919
发布于:
修改于:
发布于:
修改于: